As an Amazon Associate, we earn from qualifying purchases. This is without any additional costs for the buyer but does support us in maintaining our website.
Building a canoe can be inspiring a gradual emergence of shape from a forest giant tree to a smooth, constructed boat. Make building your canoe your creative outlet that can help you escape from the stress and time-pressures of your daily life. Use these innovative and time-efficient building techniques to build a light, aesthetically pleasing and efficient canoe.
How to Build a Canoe
Step 1: Canoe skeleton base

To begin with, you can buy ready-made canoe dimension outlines and choose a design that fits your individual paddling style. Remember to obtain lumber material used should be light enough that strong back structure could easily be moved, stored or if required, easily disassembled.
This process may take a few hours to transform flat paper designs into three dimensions, if done correctly, before the first strips of wood are laid on a level workbench or building forms. Attach the forms to the strong back, this step takes general carpentry skills and tools including a square saw, clamp, hammer and drill. To begin with, begin installing the strips using C clamps only, taking time to ensure the tight strings are aligned and the center-lines match perfectly.
Next, you set into motion the construction of a sturdy beam that is shaped like a ladder called a strong back, using the fresh new lumber. While constructing make certain that the strong back is perfectly true and level front to back as well as from corner to corner, by using the sight vanes and tight strings as guidance lines.
Step 2: Stripping the Canoe

Building a canoe with staples opposed to without staples or using cove and bead strips against square cut strips comes down to aesthetics, familiarity with the material and personal preference. The easiest and most popular materials to use are staples with square cut strips.
Building with staples is recommended as constructing without staples, you most likely will be able to apply only two or three individual strips per session, as it will involve way more clamps, cam straps, bungee cord and masking tape making this method more time consuming. Stripping an entire canoe make take more than a few days, even for the most seasoned builder.
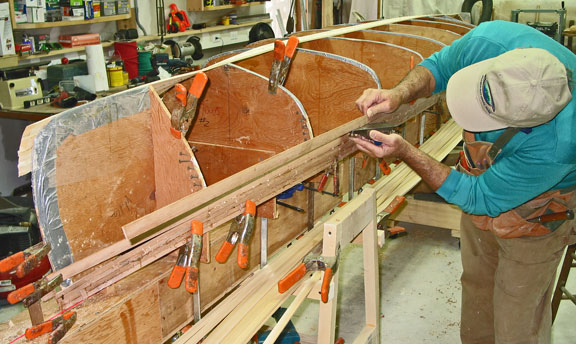
To convert the simple skeleton into solid object you must then lay the staples and square cut strips onto the building forms. The initial strip should always follow the sheer line while the second should contact the first at the center form. To save time, establish a rhythm that can help you complete the large area of the hull.
Step 3: Laminating the Canoe
Laminating is the term used for applying epoxy resin and fabric to the hull. Commence by sanding and leveling the hull down, cutting and dry fitting cloth, put out spreaders, brushes and scissors in preparation for the process of laminating. This meticulous preparation must be done correctly since most epoxy resin systems only work for a short period of time so laminating can only occur within that relatively short window.
The most commonly used fabric is 6-oz. fiberglass but you can be creative, and if your budget allows you to use carbon, Kevlar or polyester fabrics that enhance abrasion resistance, strength and is more visually pleasing to most.
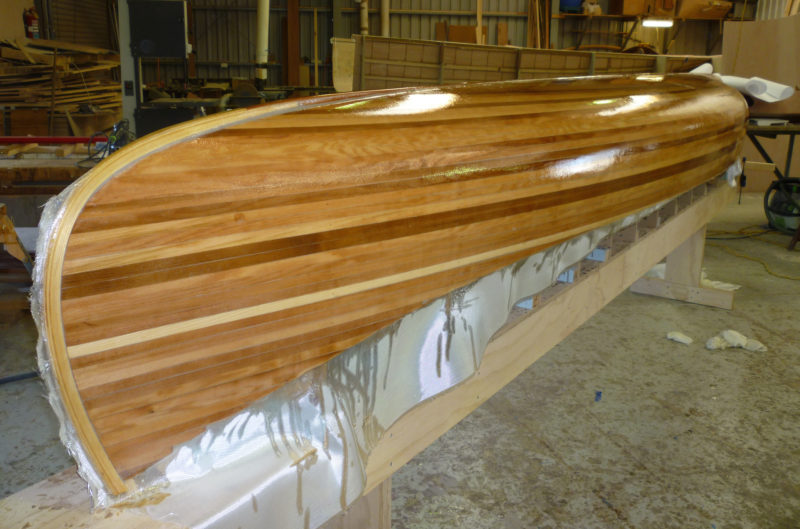
Always start laminating the exterior of the hull so when that is complete the boat can be hauled off the building forms or work bench, and then you can spend time repeating the preparing and laminating process to the hull interior. If you decide to use a protective varnish coat, you can then finish off by using chip brushes to smooth over the epoxy resin and varnish, for a glossy, even look.
Step 4: Finishing

Finally, you must put on finish trims usually including gunwales and seats together with your canoe. There are two functions that the trims serves; firstly attach the gunwales and cross members to the canoe, as these provide structure to impede a naked hull from twisting and flexing. Next, seats not only provide a comfortable place to sit or kneel, it is essential in the usability of the boat in the way of carrying the canoe to and from the water.
Handcrafting a canoe seat can be a wearisome task that can take an expert a whole day to complete one, so pre-milled gunwales and custom canoe seats can be purchased, if you cannot hold in your excitement no more and want to paddle away as soon as possible.
Need Some Inspiration? Bonus Video!
Sources
http://www.instructables.com/id/Building-A-Cedar-Strip-Canoe/


